How to create a new Google Tag Manager container for a PracticeBeat customer, or update an existing one, using the official PracticeBeat Essentials template.
Before you start
Google Tag Manager has two levels. The account belongs to the customer as a whole; the containers live inside it. Most customers have a single container, though a few have two or three — so when you open an account, make sure you pick the right container before changing anything.
| Existing customer Their account and container are already in the Tag Manager list. Open the container and skip straight to Step 4. On import you will usually choose Merge rather than Overwrite. | New customer Nothing exists yet. Start at Step 1 and create the account plus its first container, then continue through the whole guide. On import you will choose Overwrite. |
1. Create the account and container (new customers only)
Step 1 — Find the customer in Tag Manager
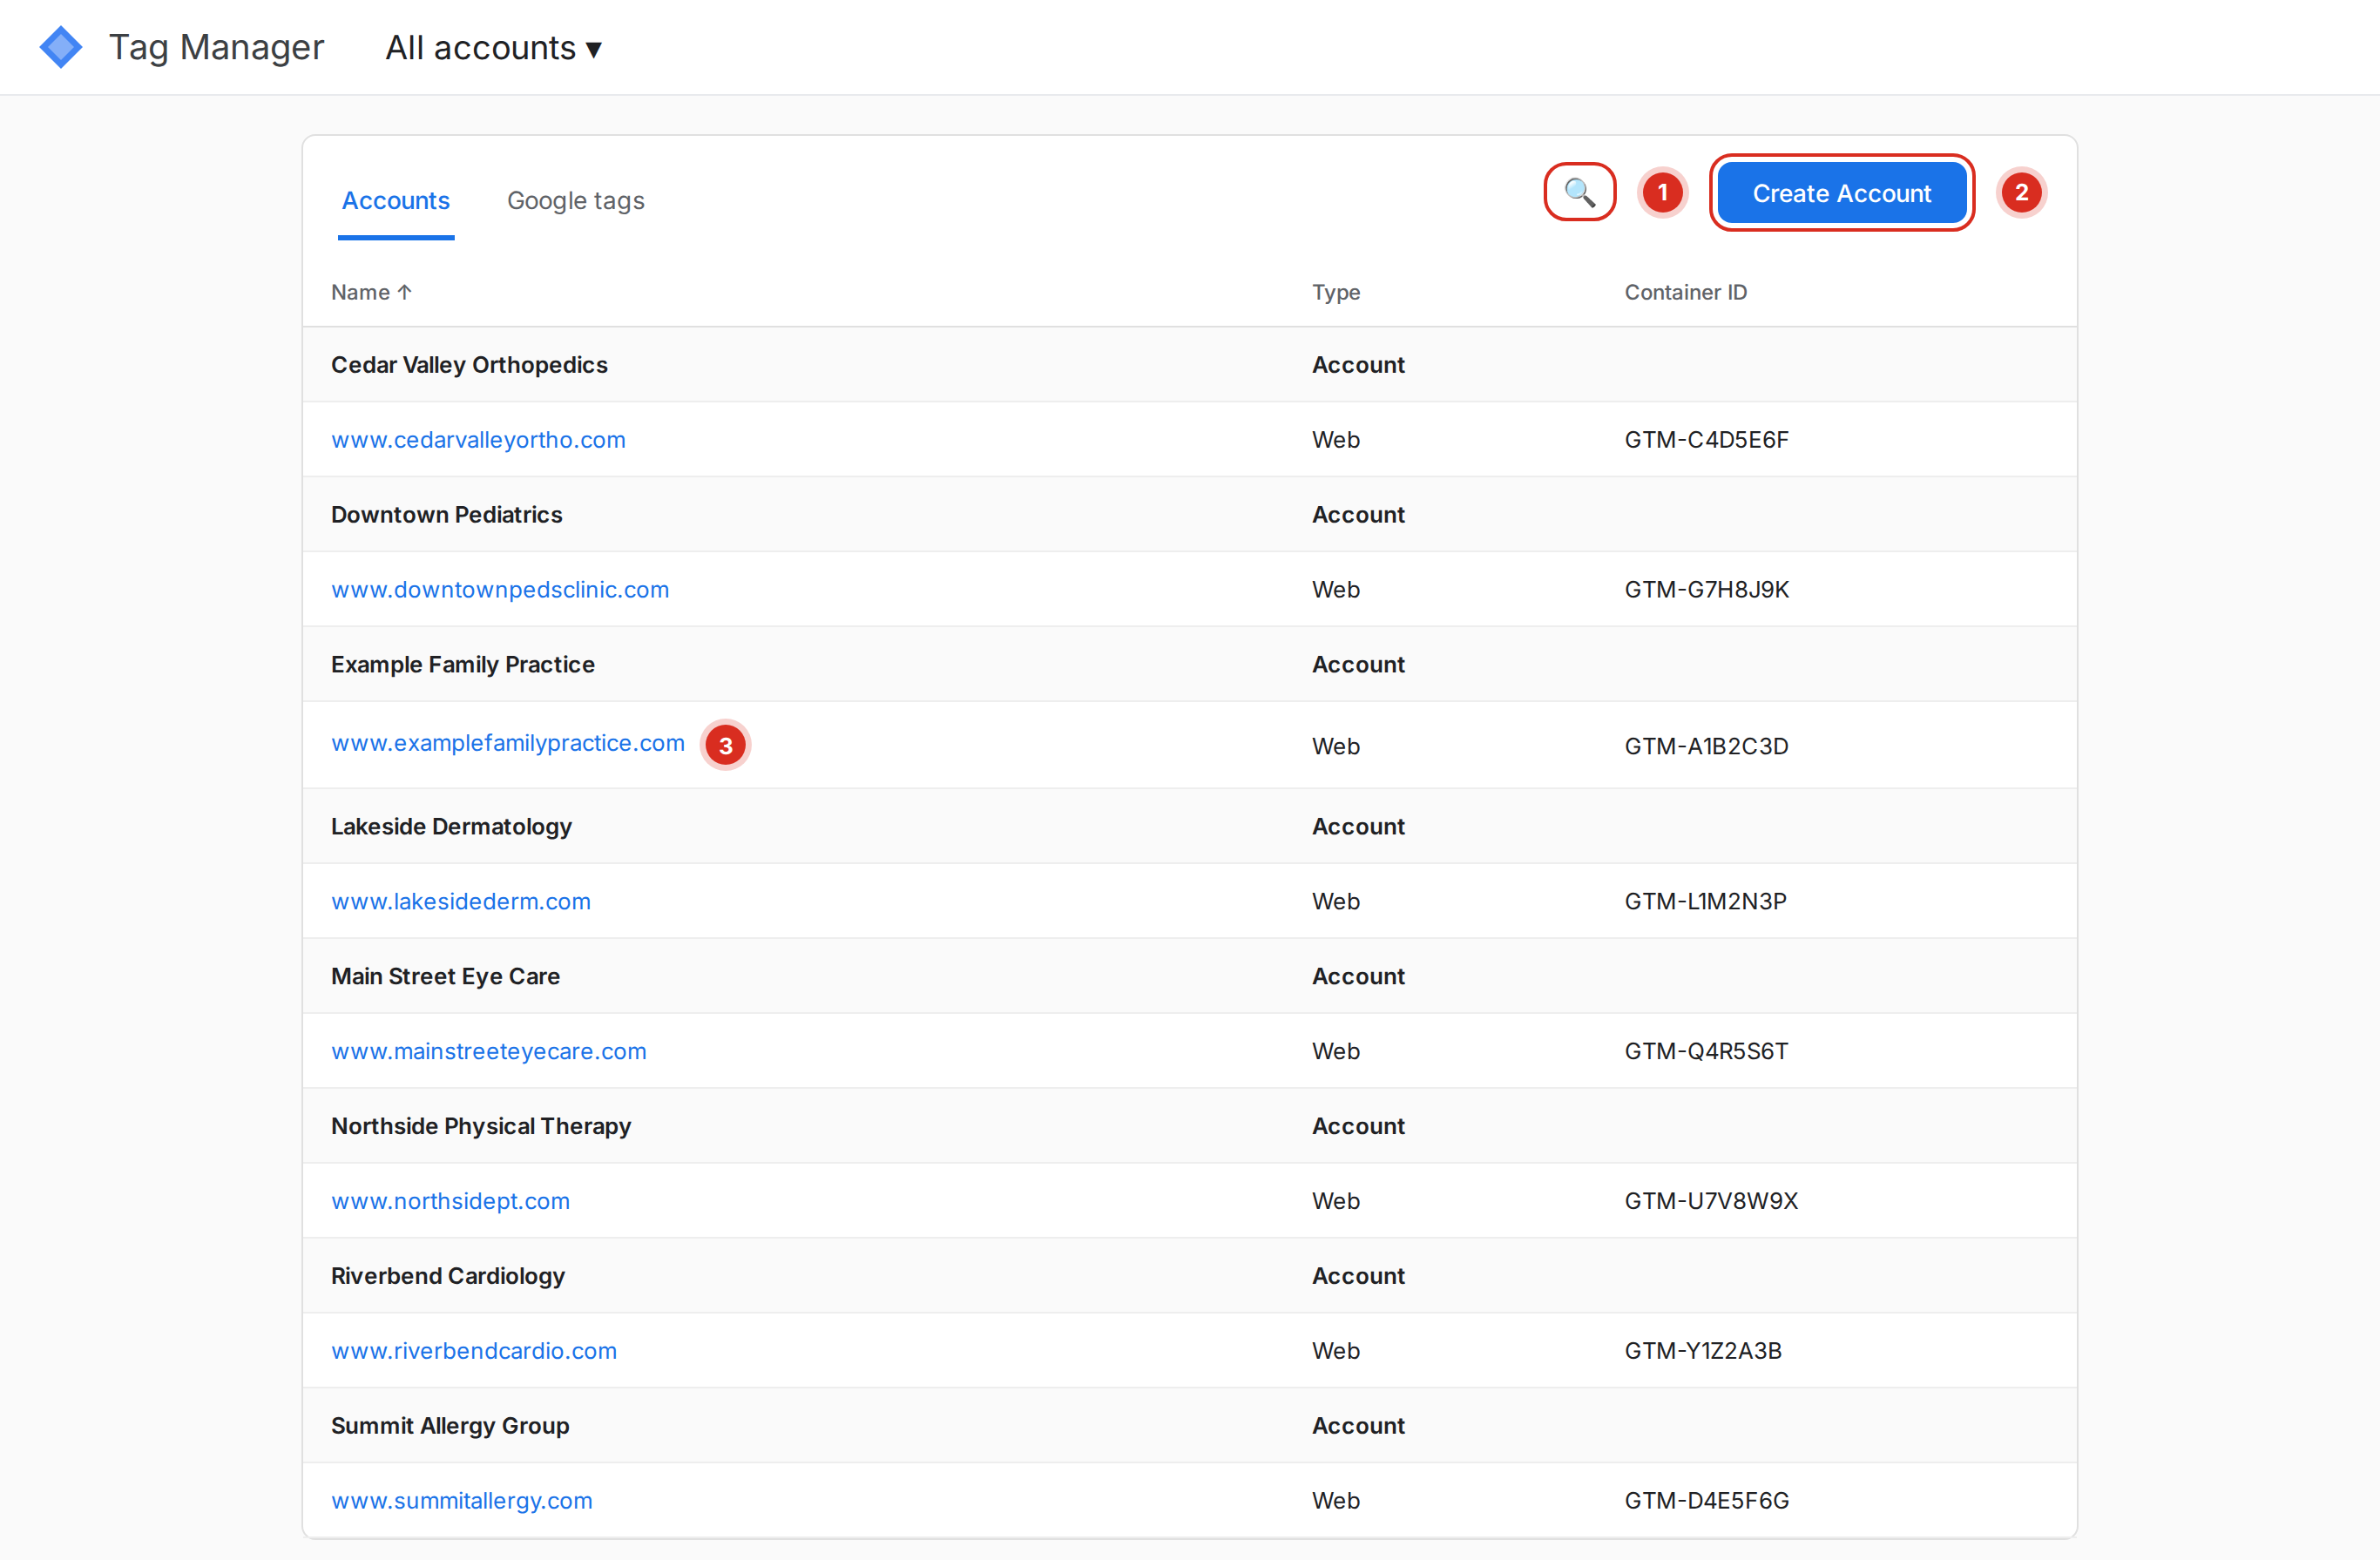
Open Google Tag Manager and land on the All accounts screen. Use the search icon (1) to check whether the customer already exists — every account they own is listed with its containers underneath. If you find them, click the container name (3) to open it and jump to Step 4. If there is nothing there, click Create Account (2).
Step 2 — Fill in the account and container setup
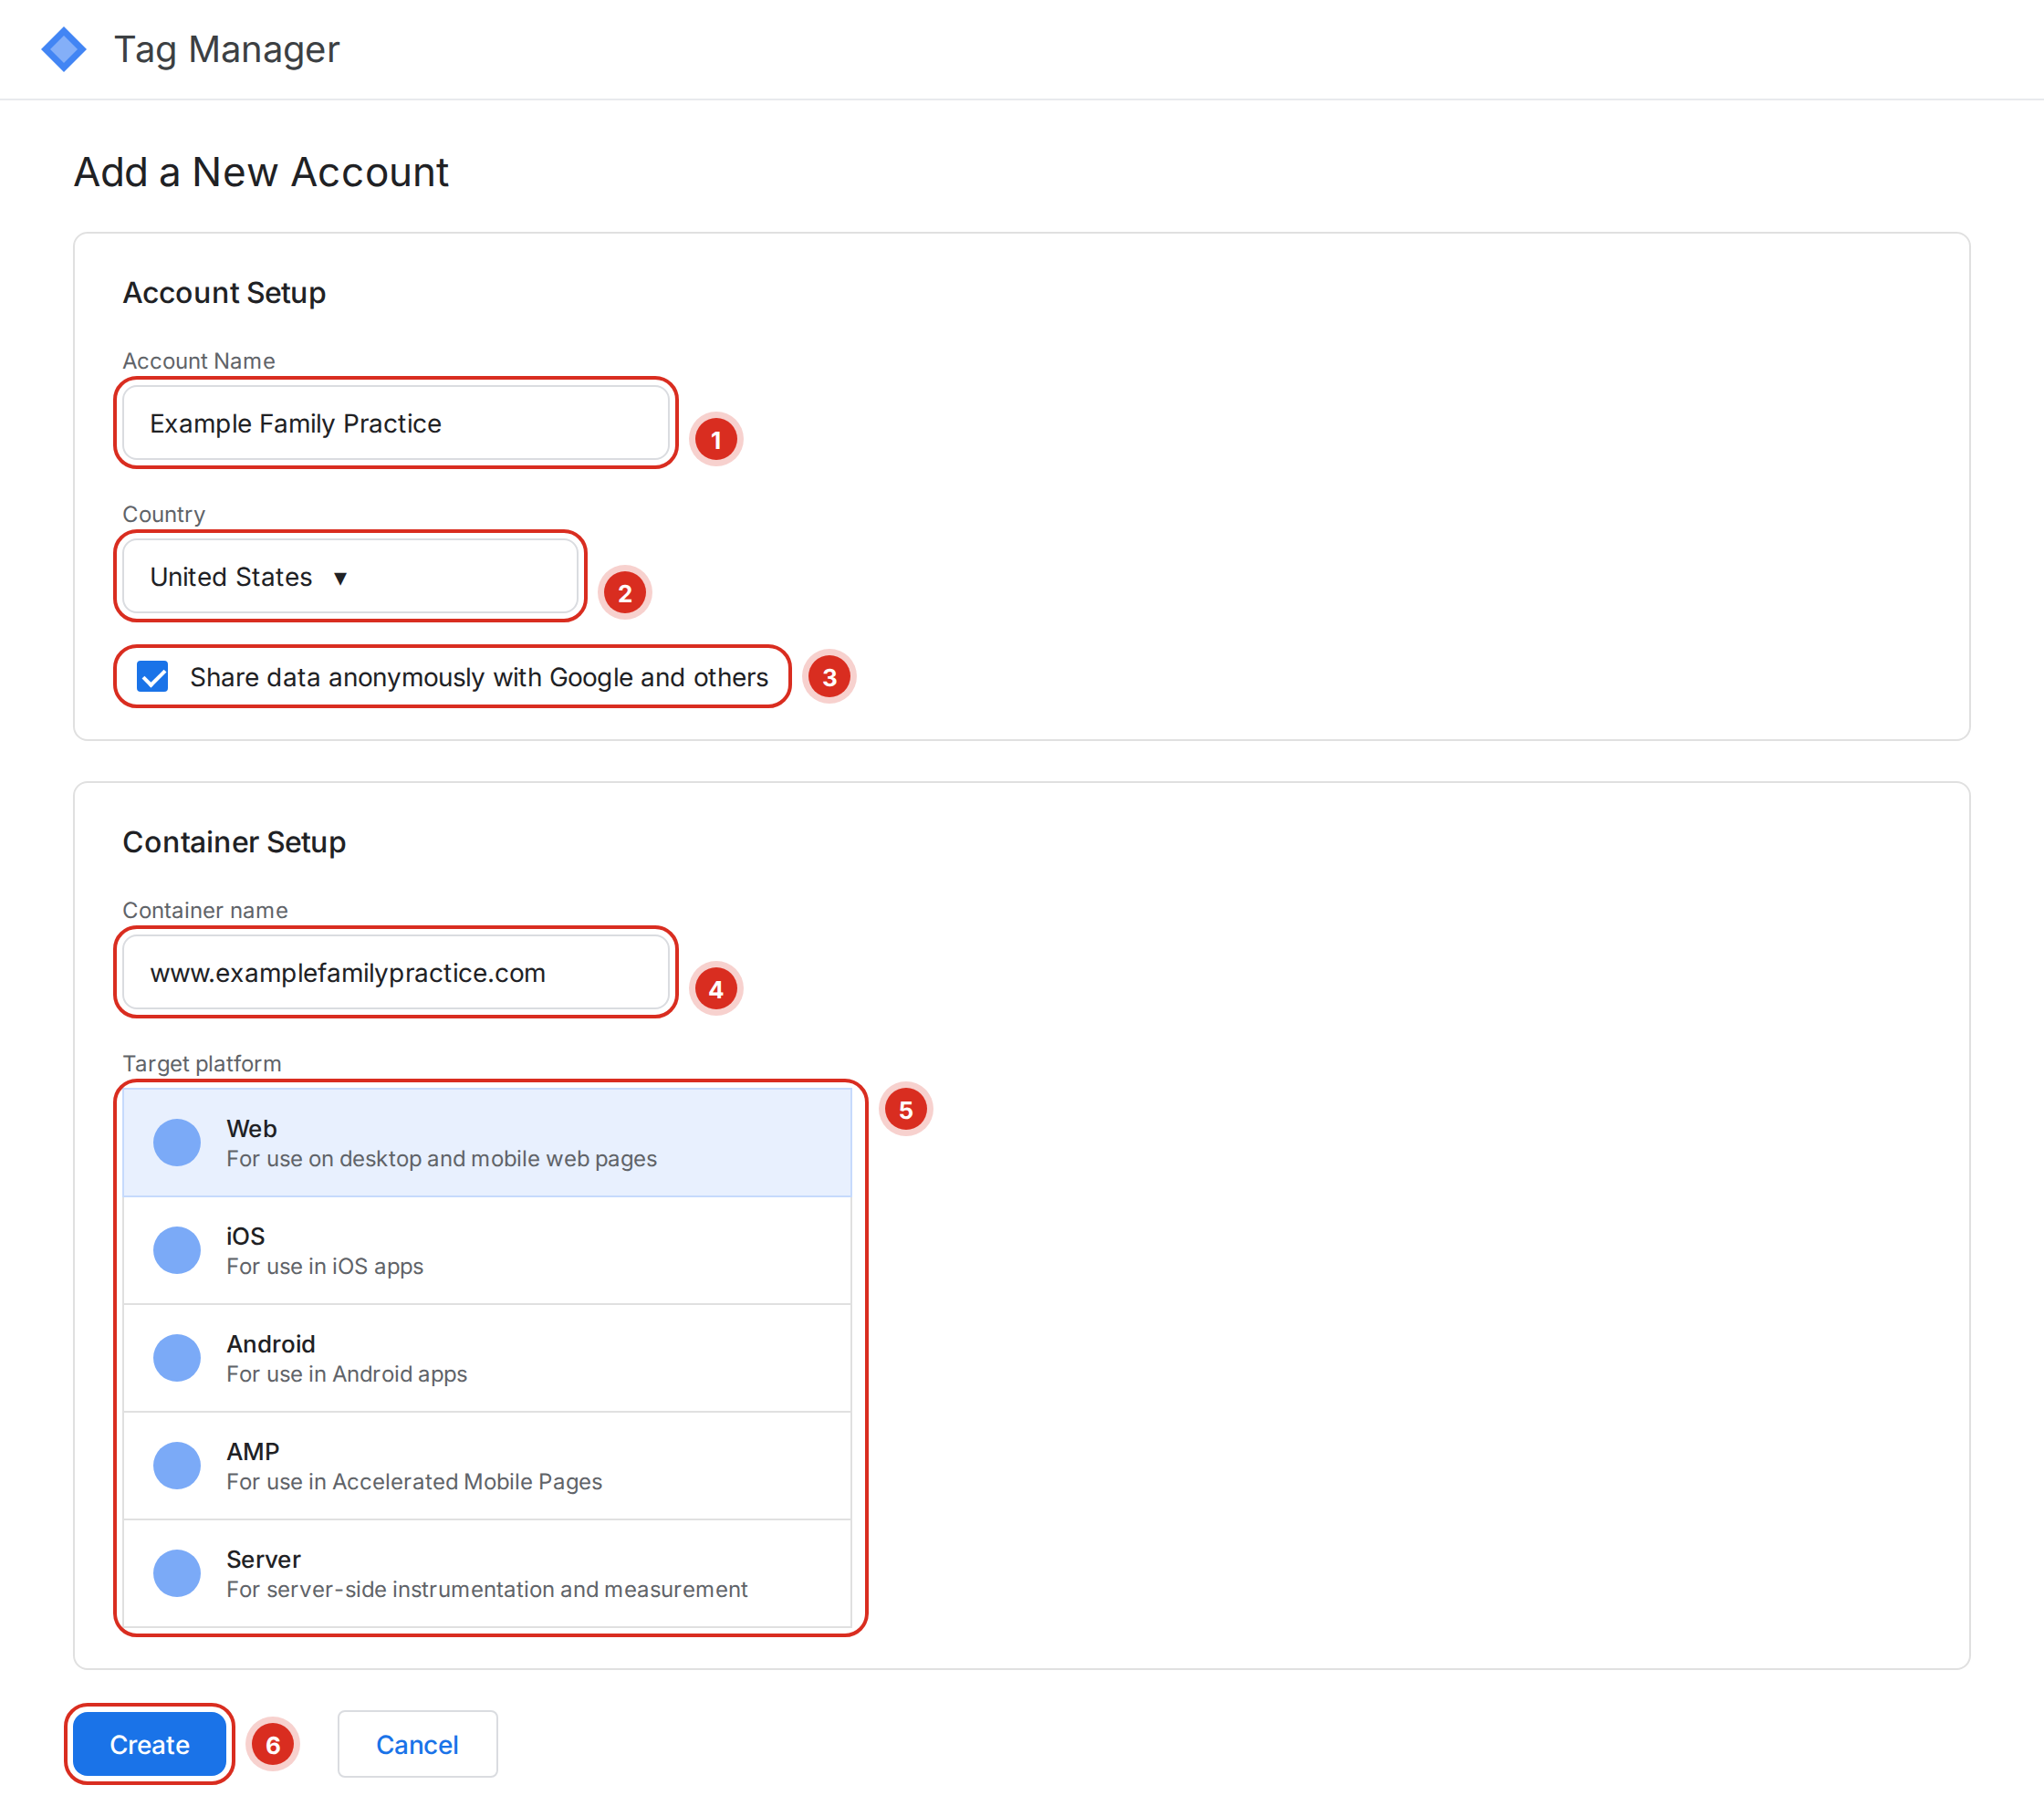
Enter the customer’s business name as the Account Name (1), leave Country as United States (2), and tick Share data anonymously with Google and others (3). For Container name (4) use the site’s domain, and choose Web as the target platform (5) — that is what a PracticeBeat site needs. Click Create (6), then accept the Google Tag Manager Terms of Service and the GDPR Data Processing Terms in the dialog that follows.
Step 3 — Copy the container ID into PracticeBeat
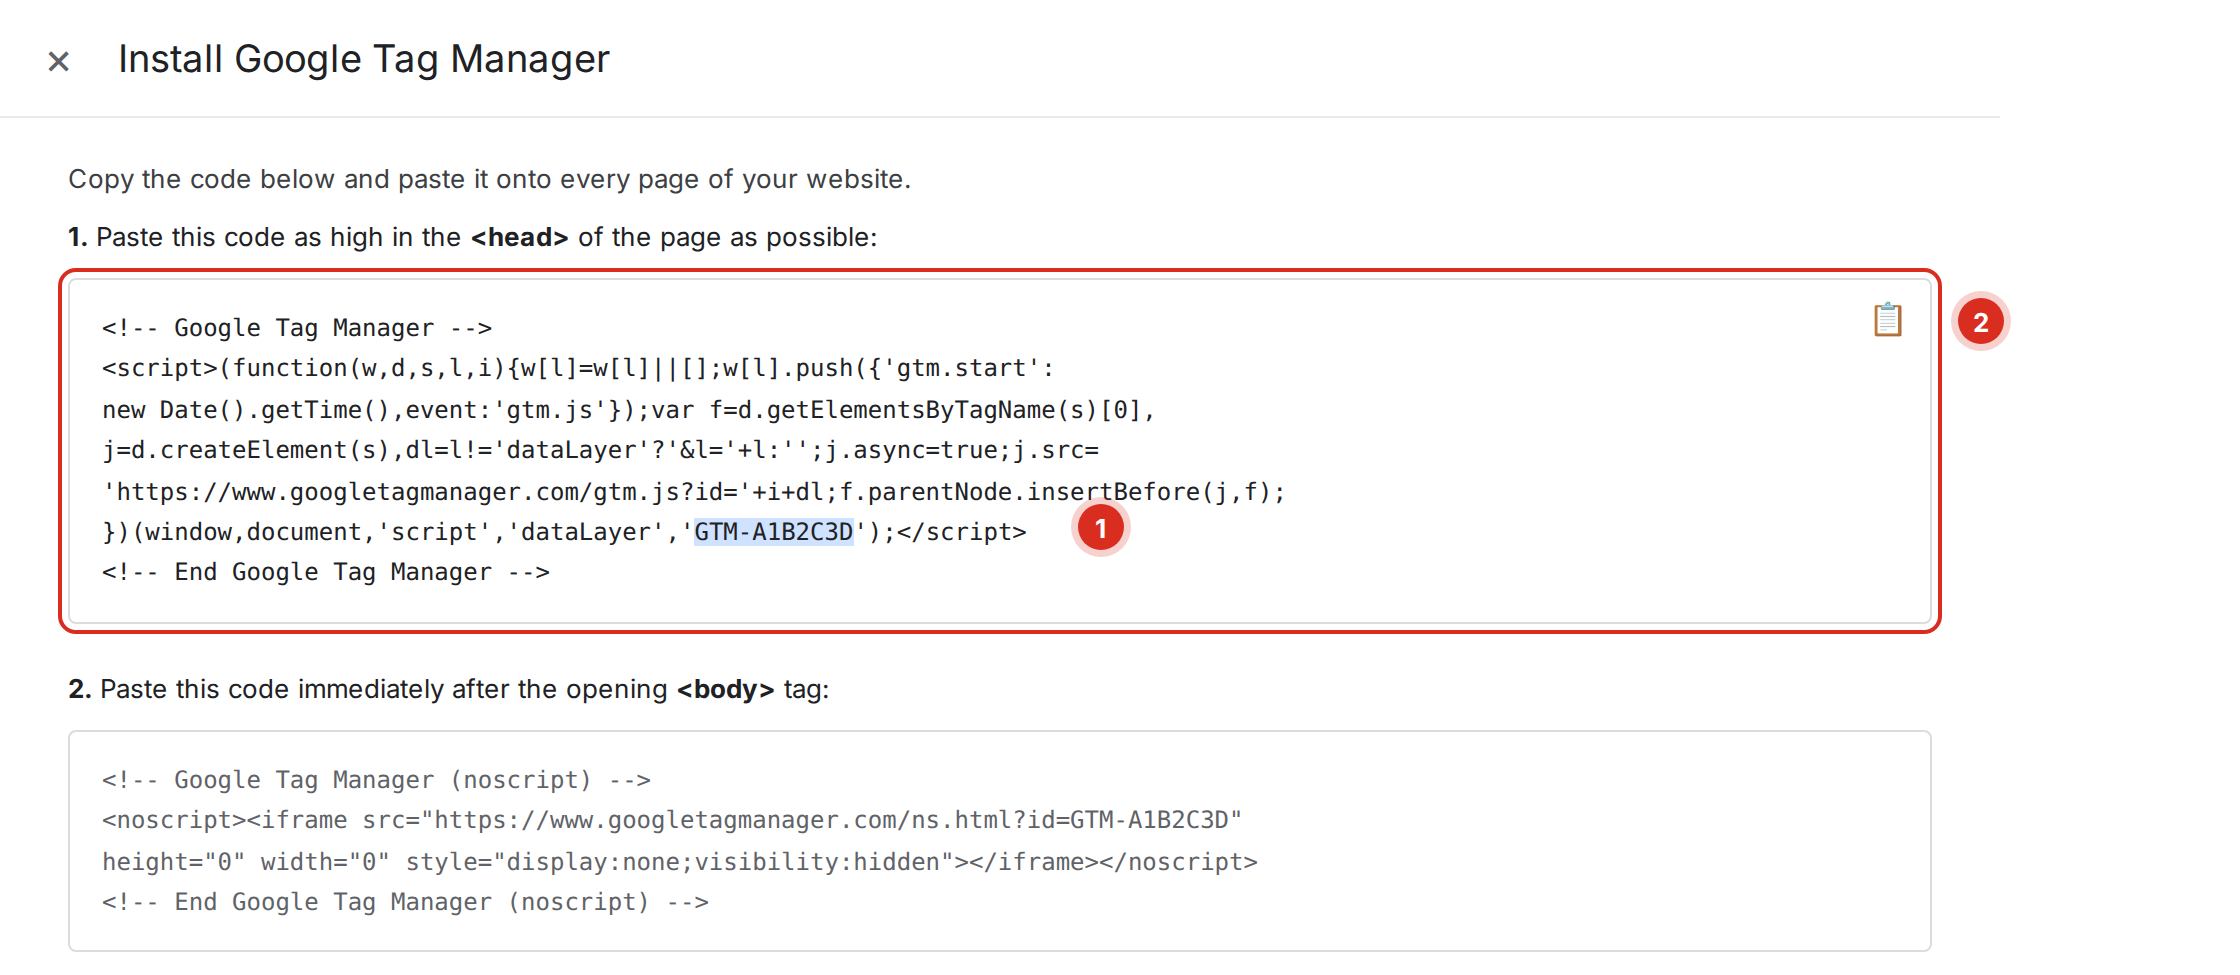
The Install Google Tag Manager dialog opens as soon as the container is created. Copy the container ID (1) — the GTM- string — using the copy button (2), and paste it into the customer’s PracticeBeat Launch Tools dashboard in the GTM field. That ID is how anything points at this specific container from now on.
2. Load the PracticeBeat template
Step 4 — Download the official template
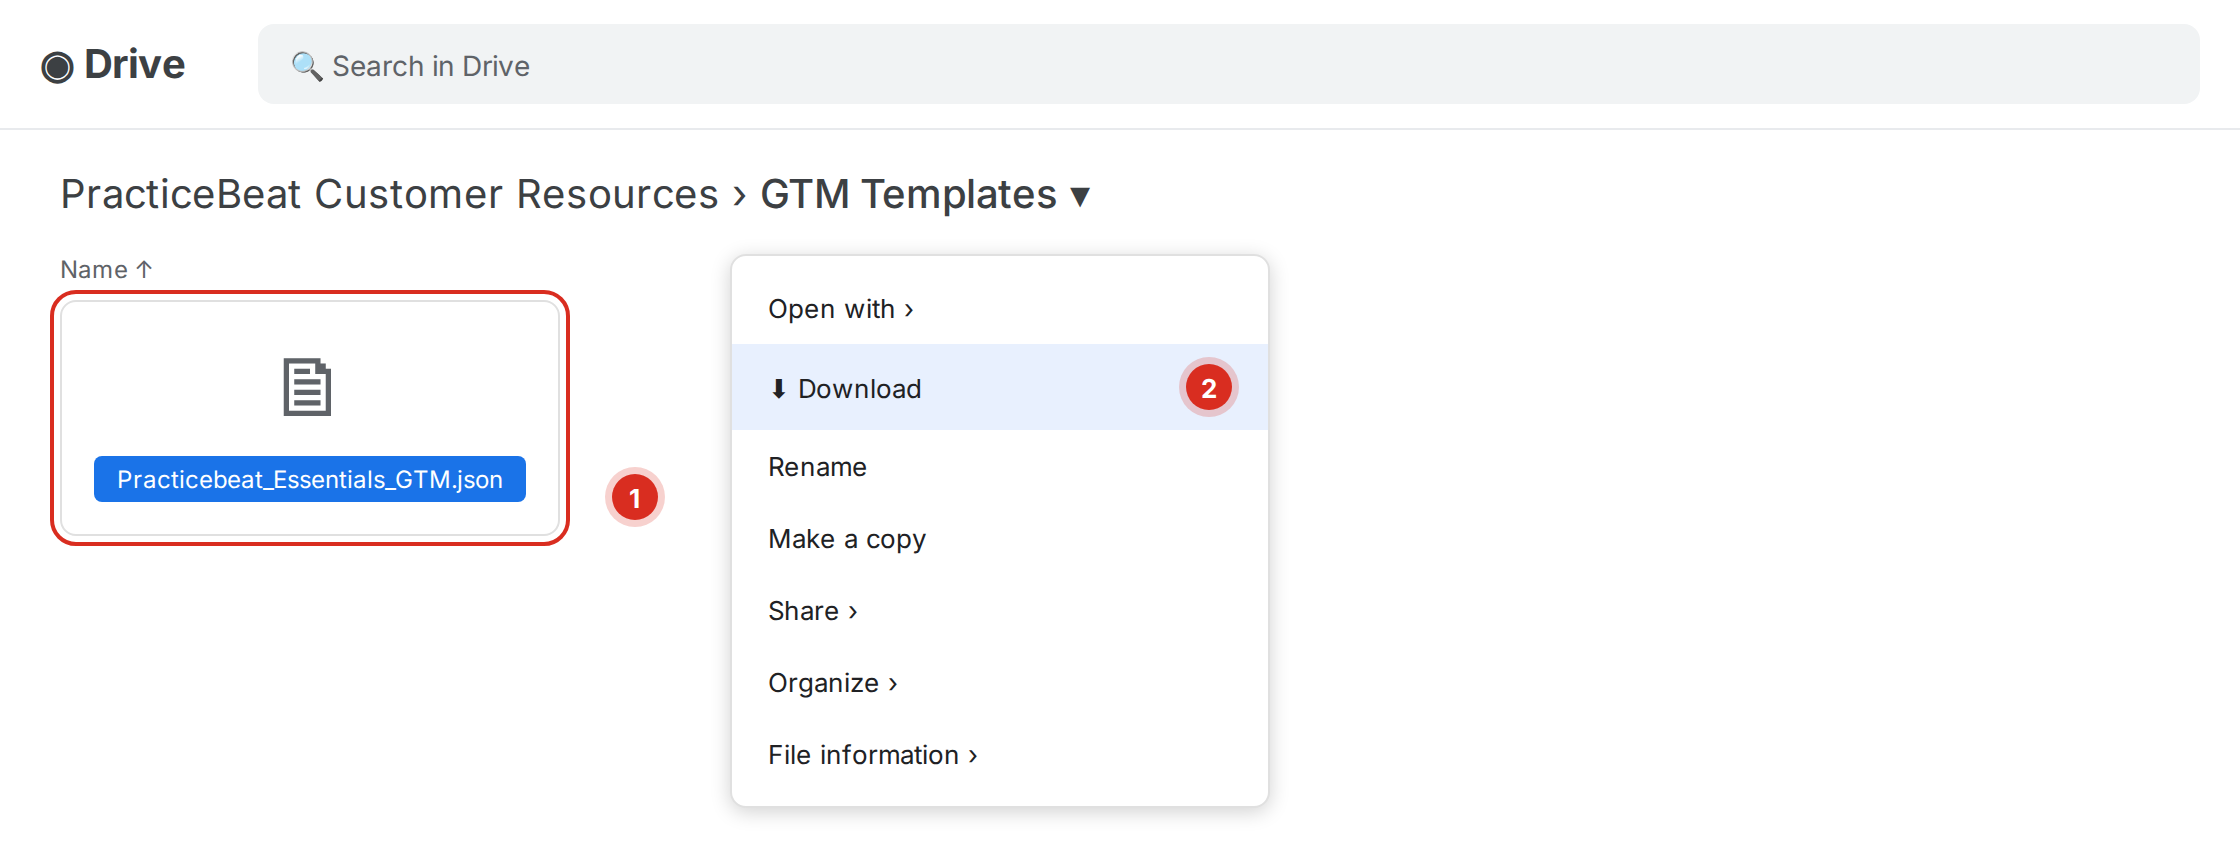
The templates live in the shared Google Drive folder PracticeBeat Customer Resources → GTM Templates. Select the template that matches the customer’s package (1) — Essentials, Ads, or another — and Download it (2) to your machine. This guide uses the Essentials template.
Step 5 — Open Import Container
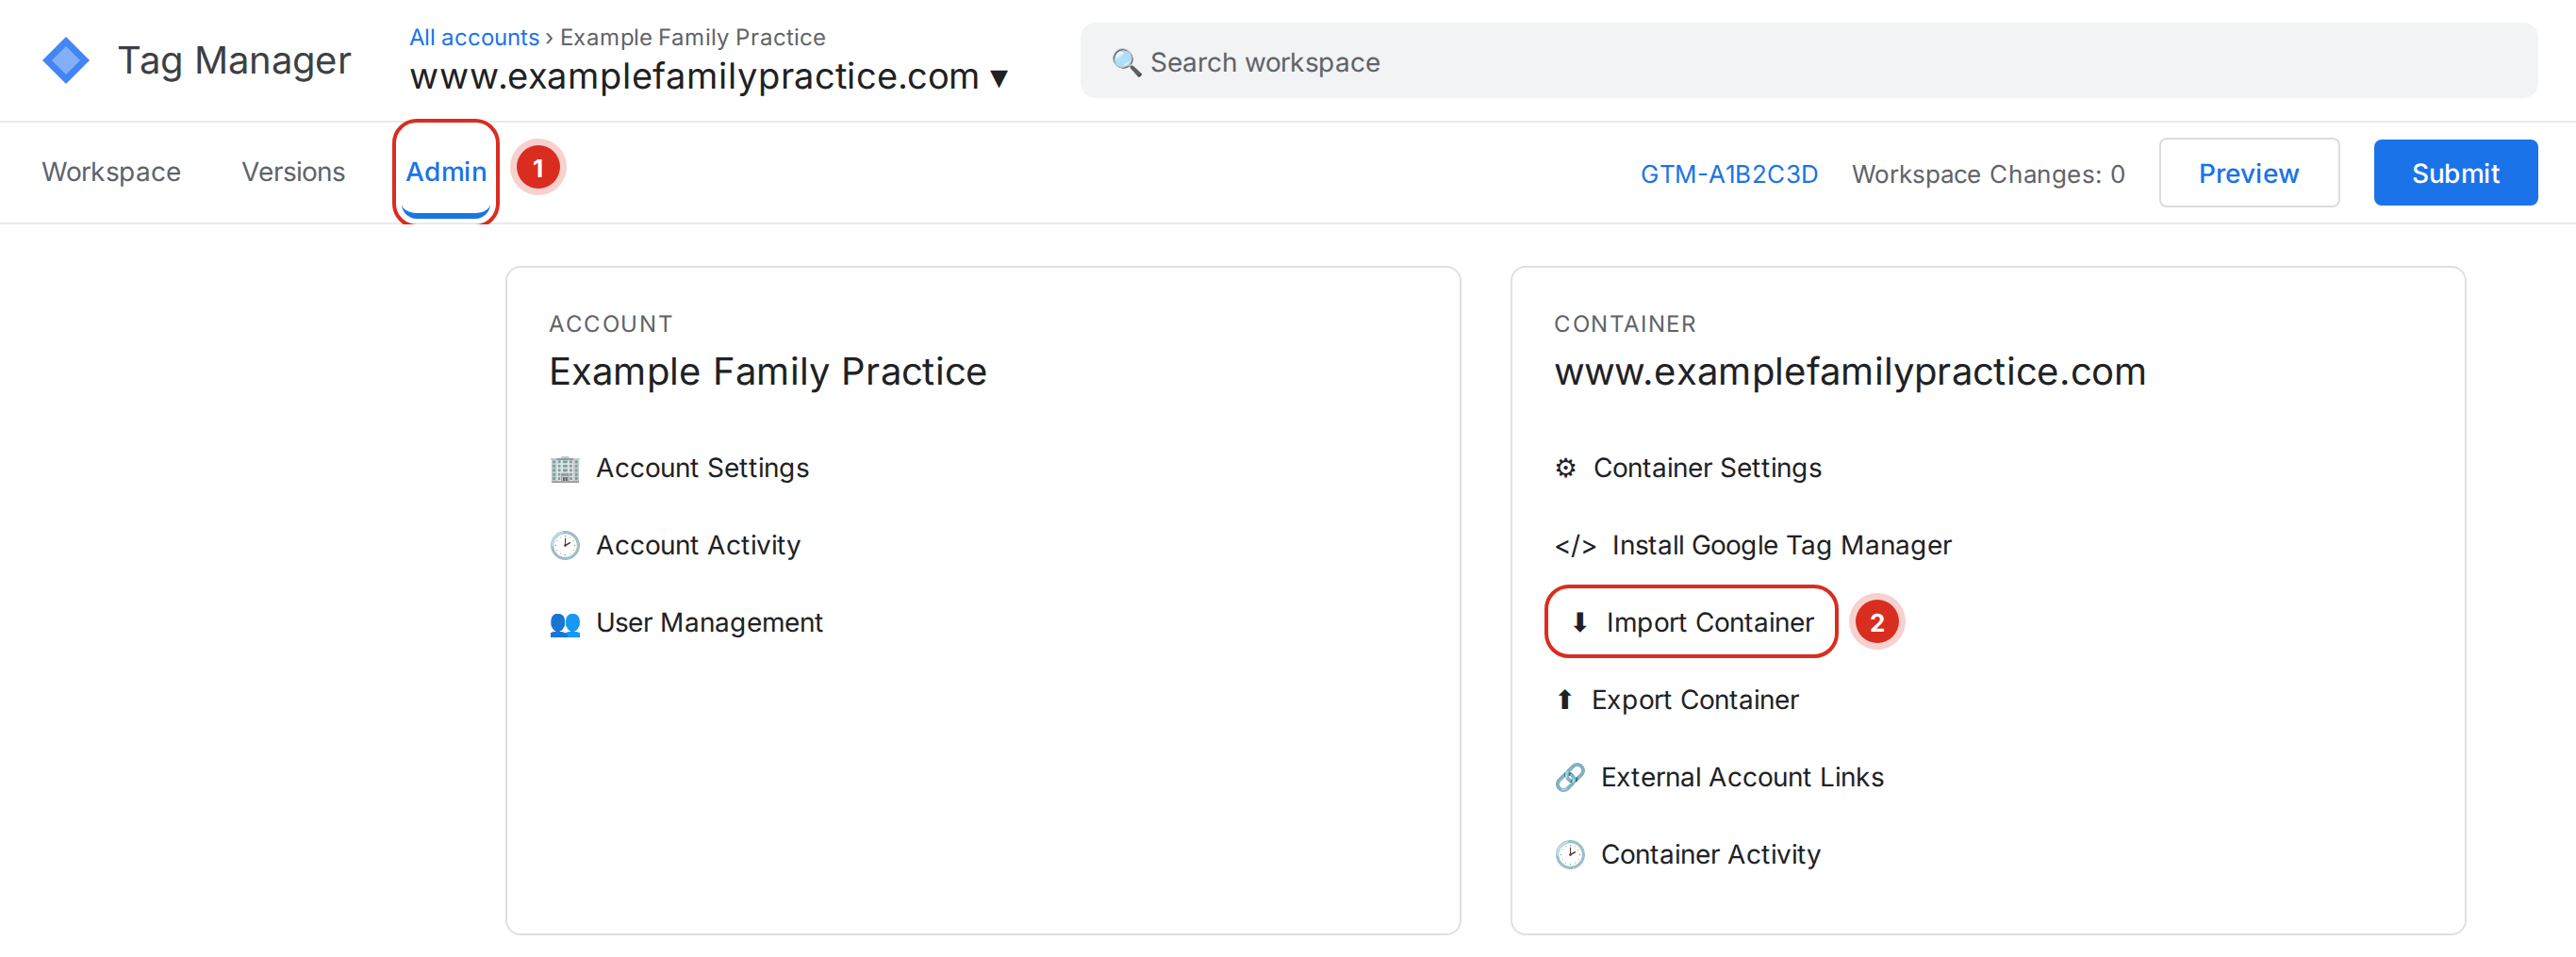
Back in the container, go to the Admin tab (1) and click Import Container (2) in the CONTAINER column.
Step 6 — Choose the file, the workspace, and the import option
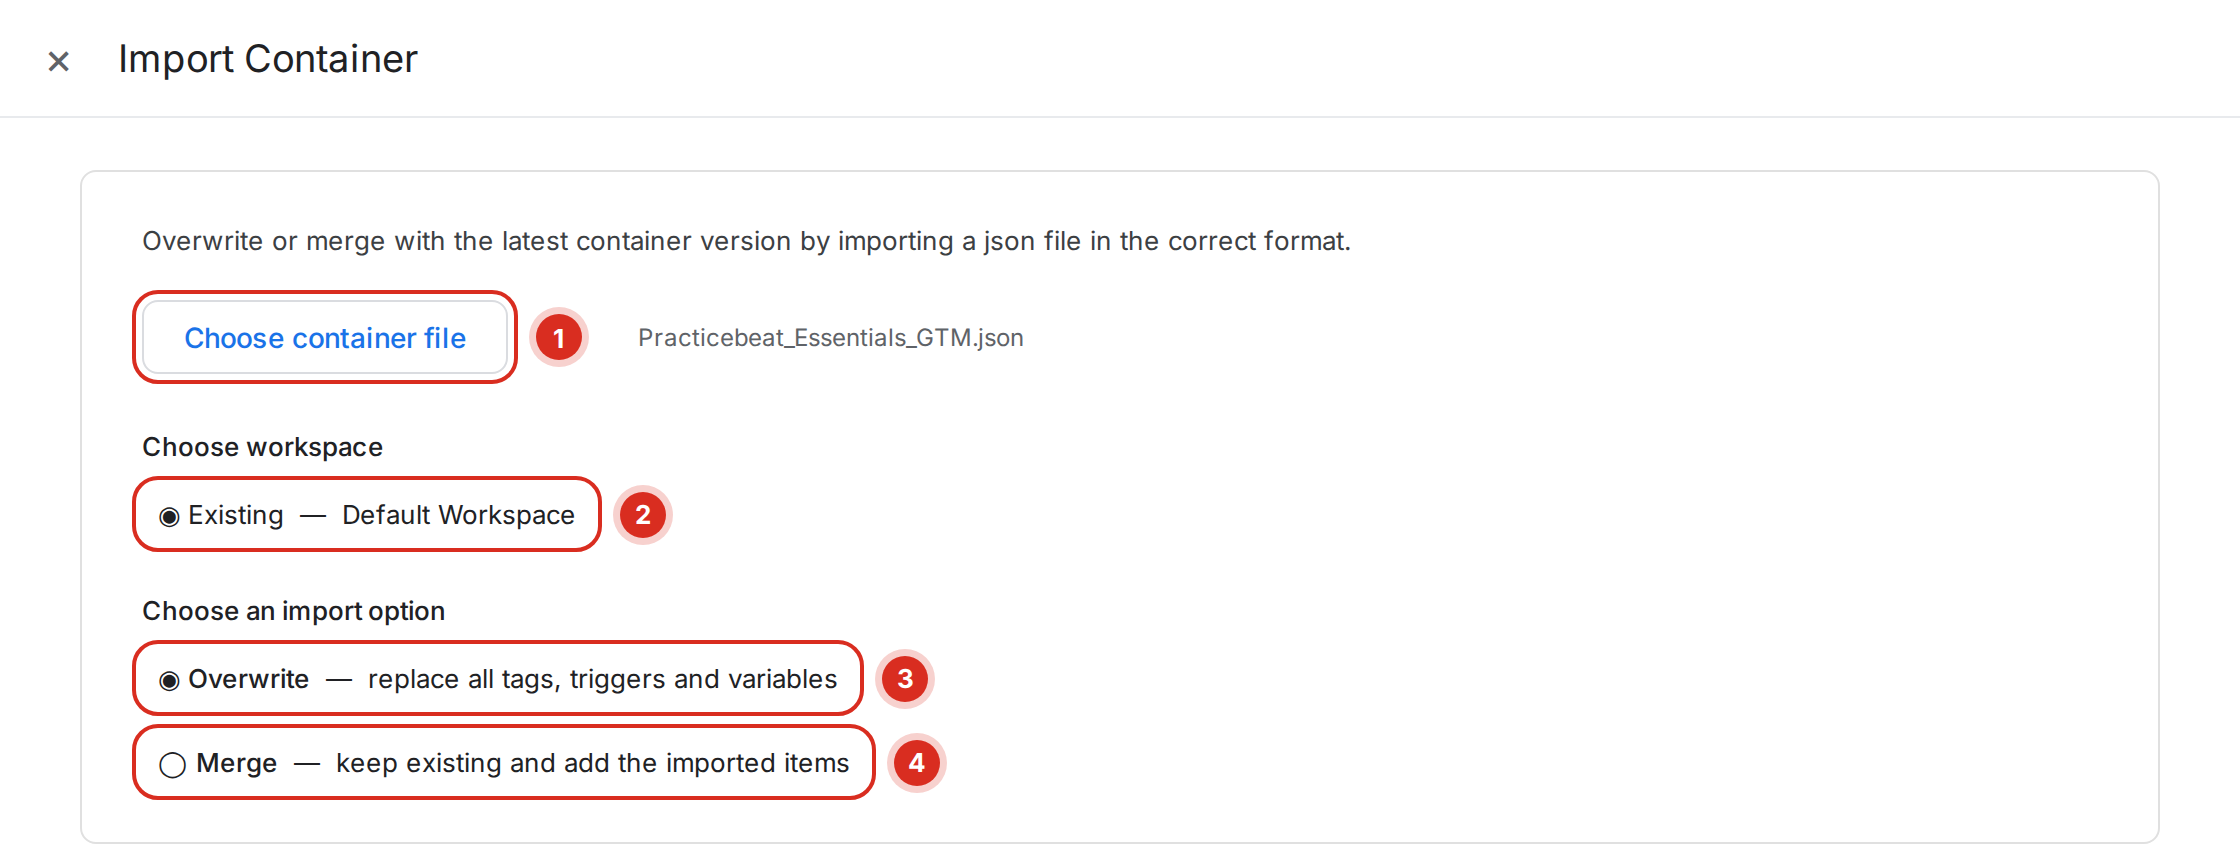
Click Choose container file (1) and pick the JSON you just downloaded. Leave the workspace on the existing Default Workspace (2). Then choose how the import lands: Overwrite (3) for a brand-new container, or Merge (4) for a customer who already has tags you want to keep.
Step 7 — Review and add to the workspace
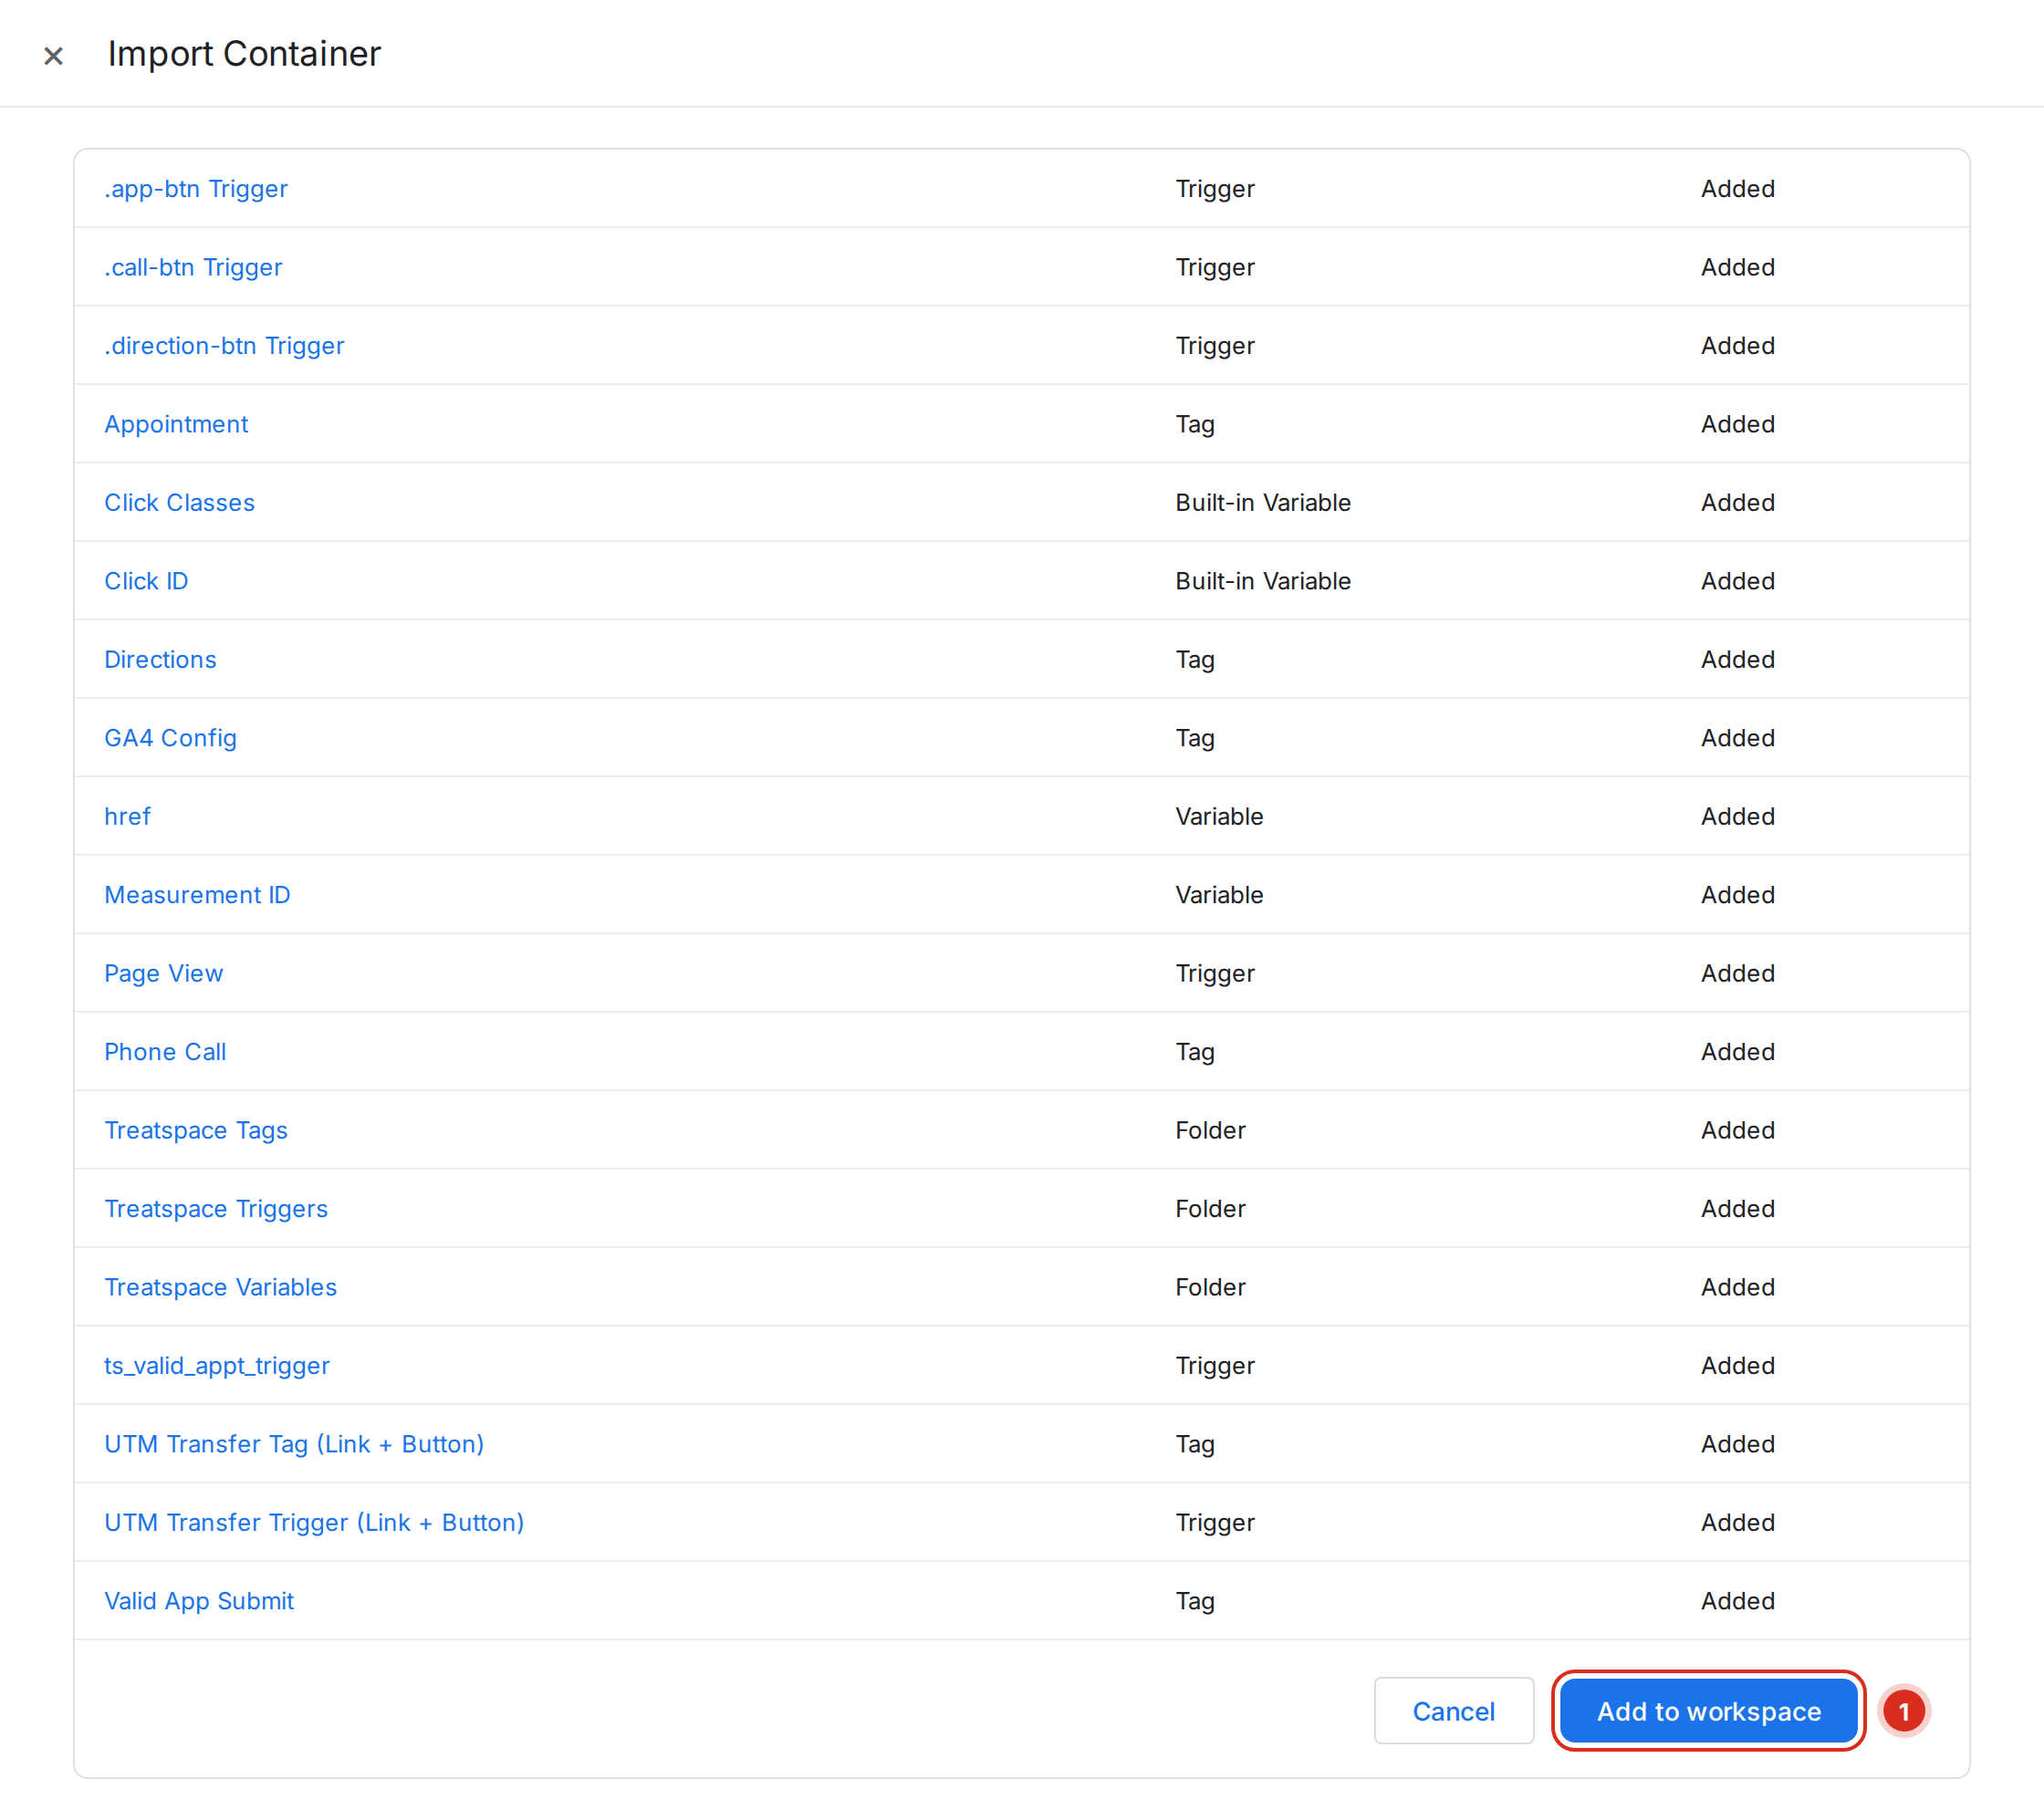
Tag Manager shows every tag, trigger, variable, and folder the import will add. Scroll through to confirm the PracticeBeat items are all there, then click Add to workspace (1).
3. Point the container at the customer
Two values in the imported template are customer-specific and must be updated before you publish: the GA4 measurement ID and the site domain.
Step 8 — Get the GA4 Measurement ID
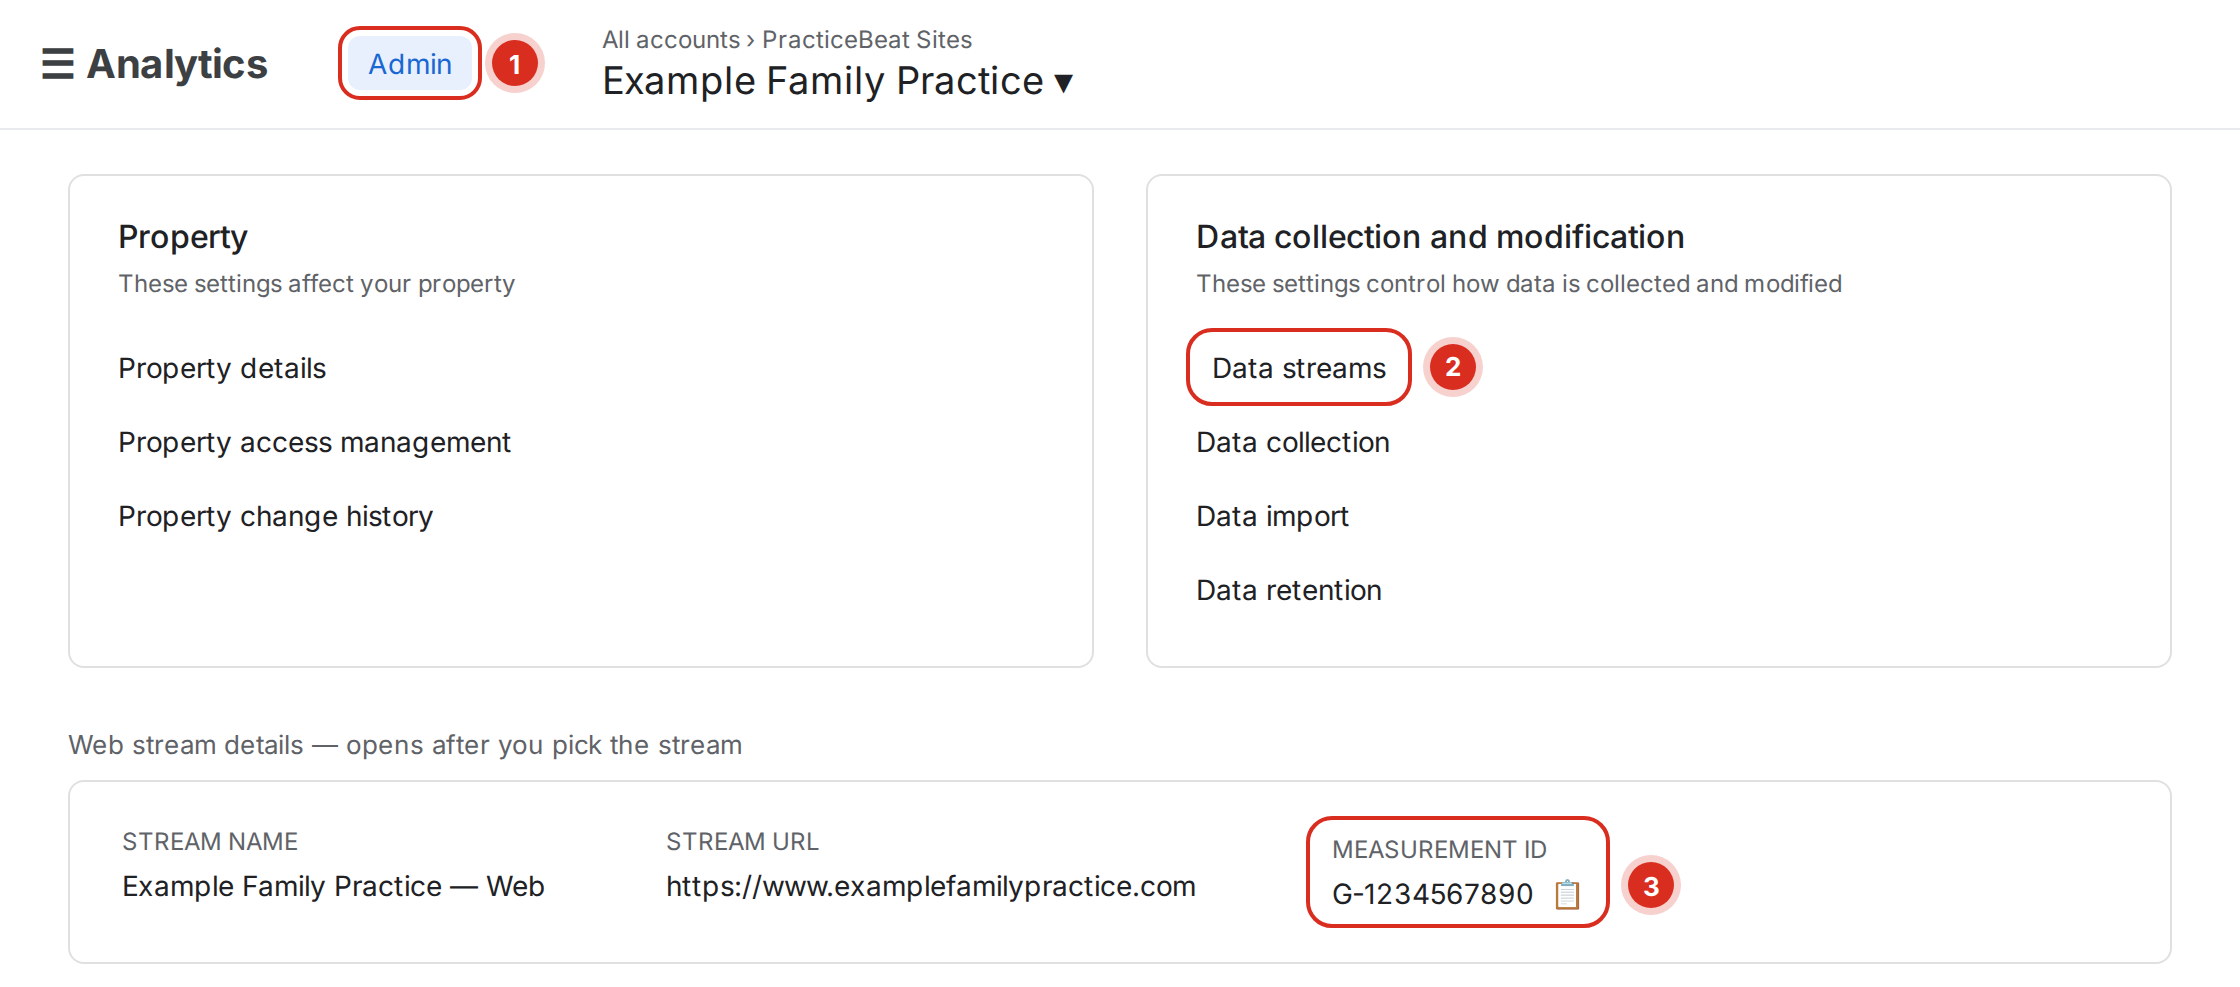
In Google Analytics, open the customer’s GA4 property and go to Admin (1) → Data collection and modification → Data streams (2). Open the web stream and copy the Measurement ID (3) — a G- followed by ten digits.
Step 9 — Paste it into the Measurement ID variable
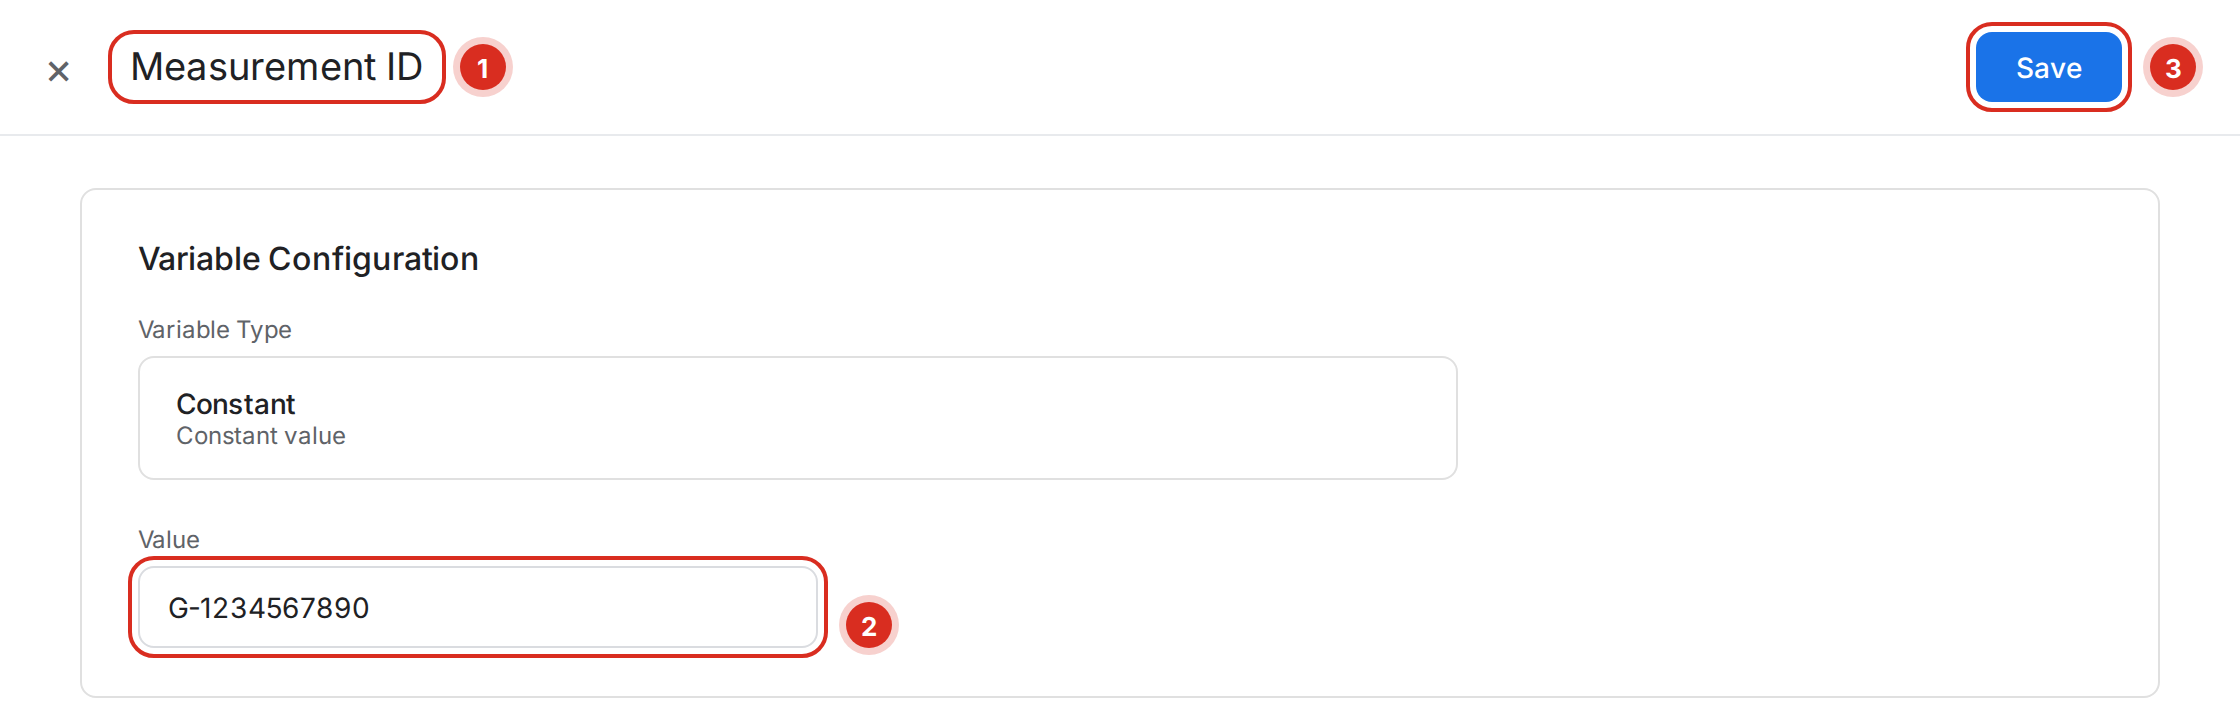
In the container, go to Variables and open the Measurement ID variable (1). Paste the ID into the Value field (2) and click Save (3).
Step 10 — Update the domain in the UTM Transfer Tag
Go to Tags and open UTM Transfer Tag (Link + Button) (1). In the Custom HTML, replace the placeholder domain inside domainsToDecorate (2) with the customer’s domain, then Save (3).
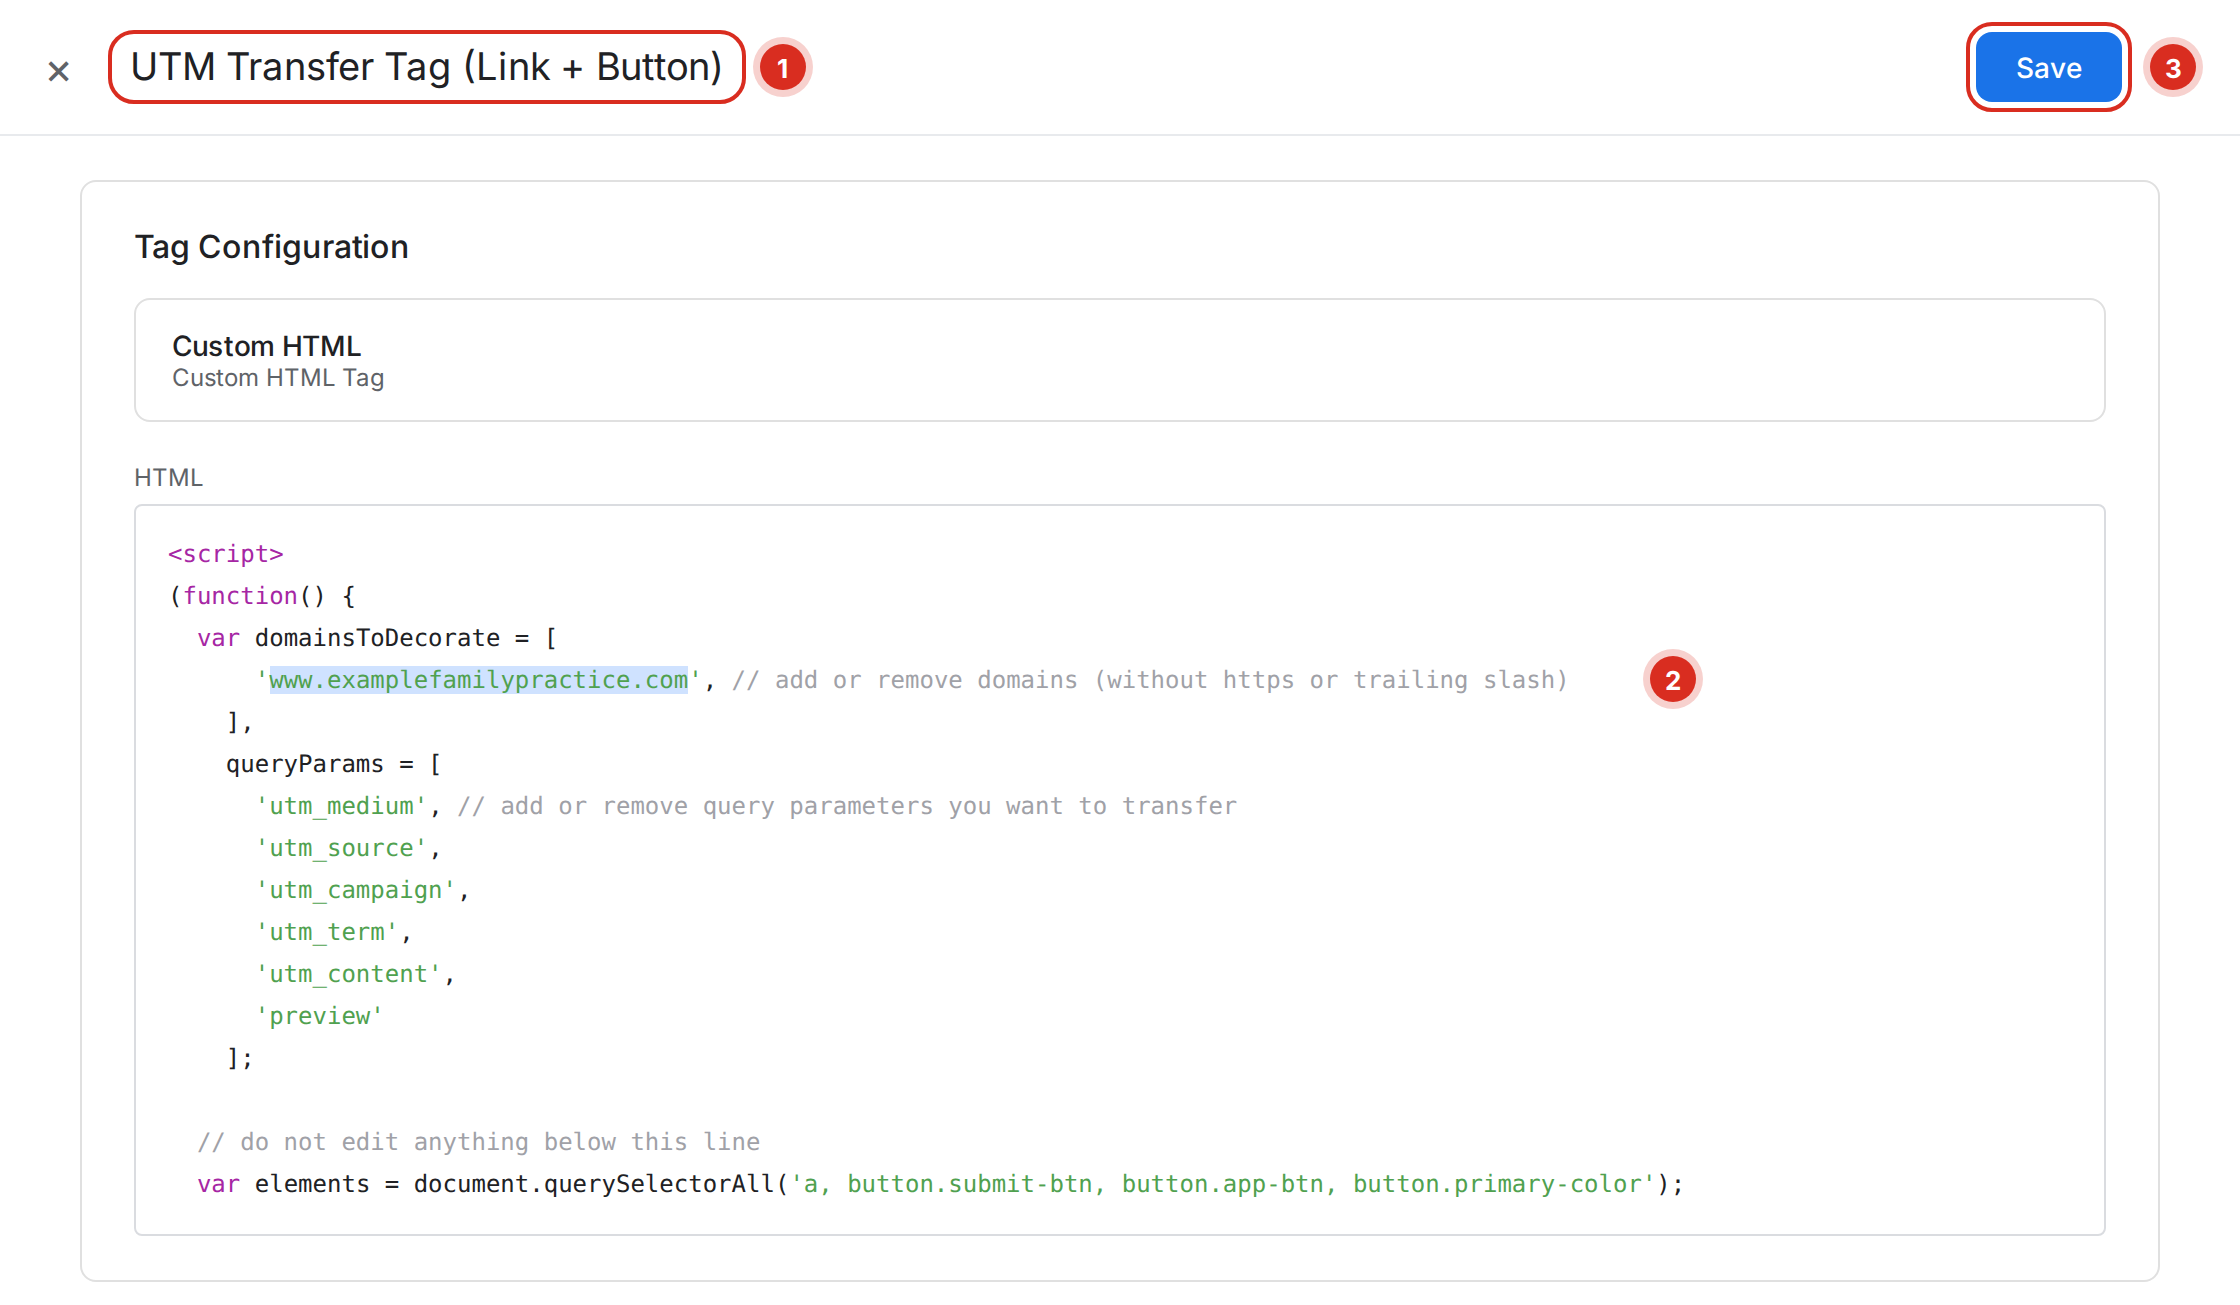
www through the .com and nothing else — no https:// and no trailing slash. The script matches on that string, so an extra prefix or slash silently stops UTM parameters from carrying across.4. Test and publish
Step 11 — Preview and test the tags
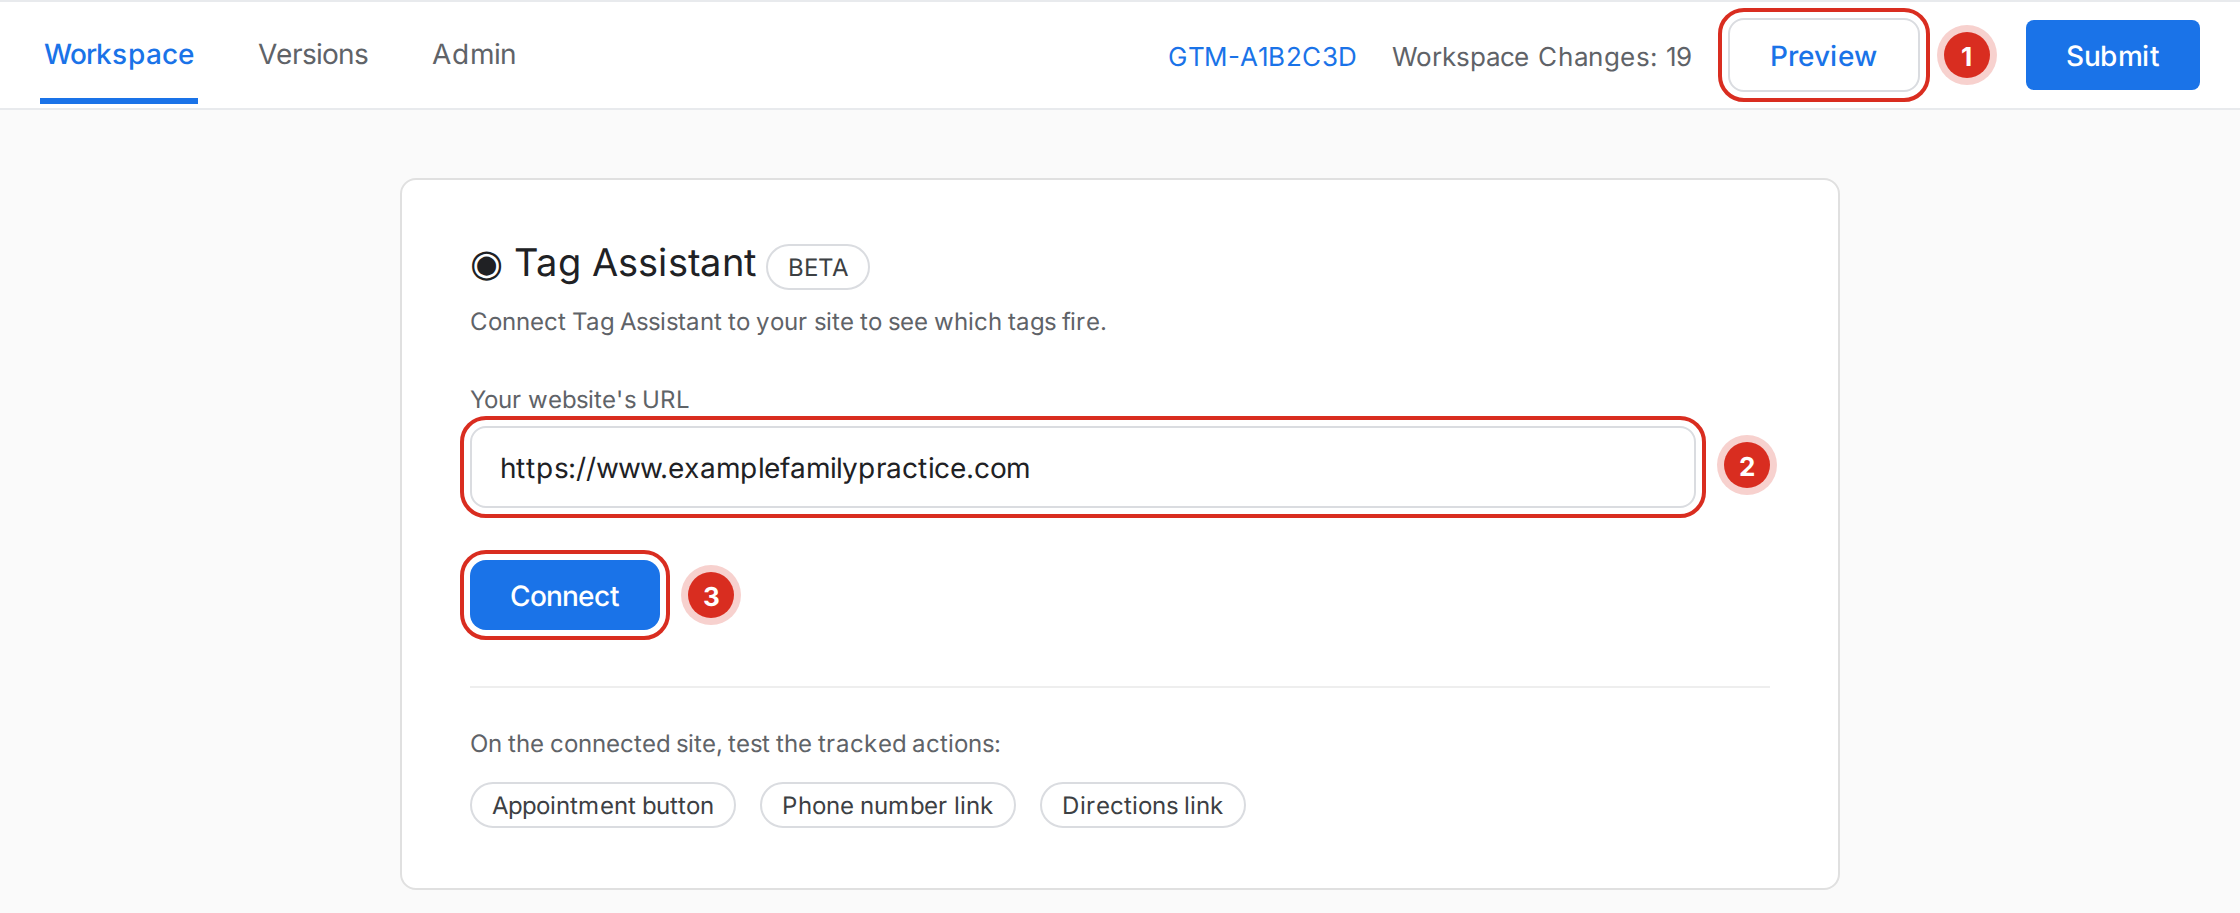
Click Preview (1), enter the customer’s URL (2) and Connect (3). On the connected site, click through the tracked actions — the appointment button, a phone number link, a directions link — and confirm in the debugger that each tag fires.
Step 12 — Submit and publish a version
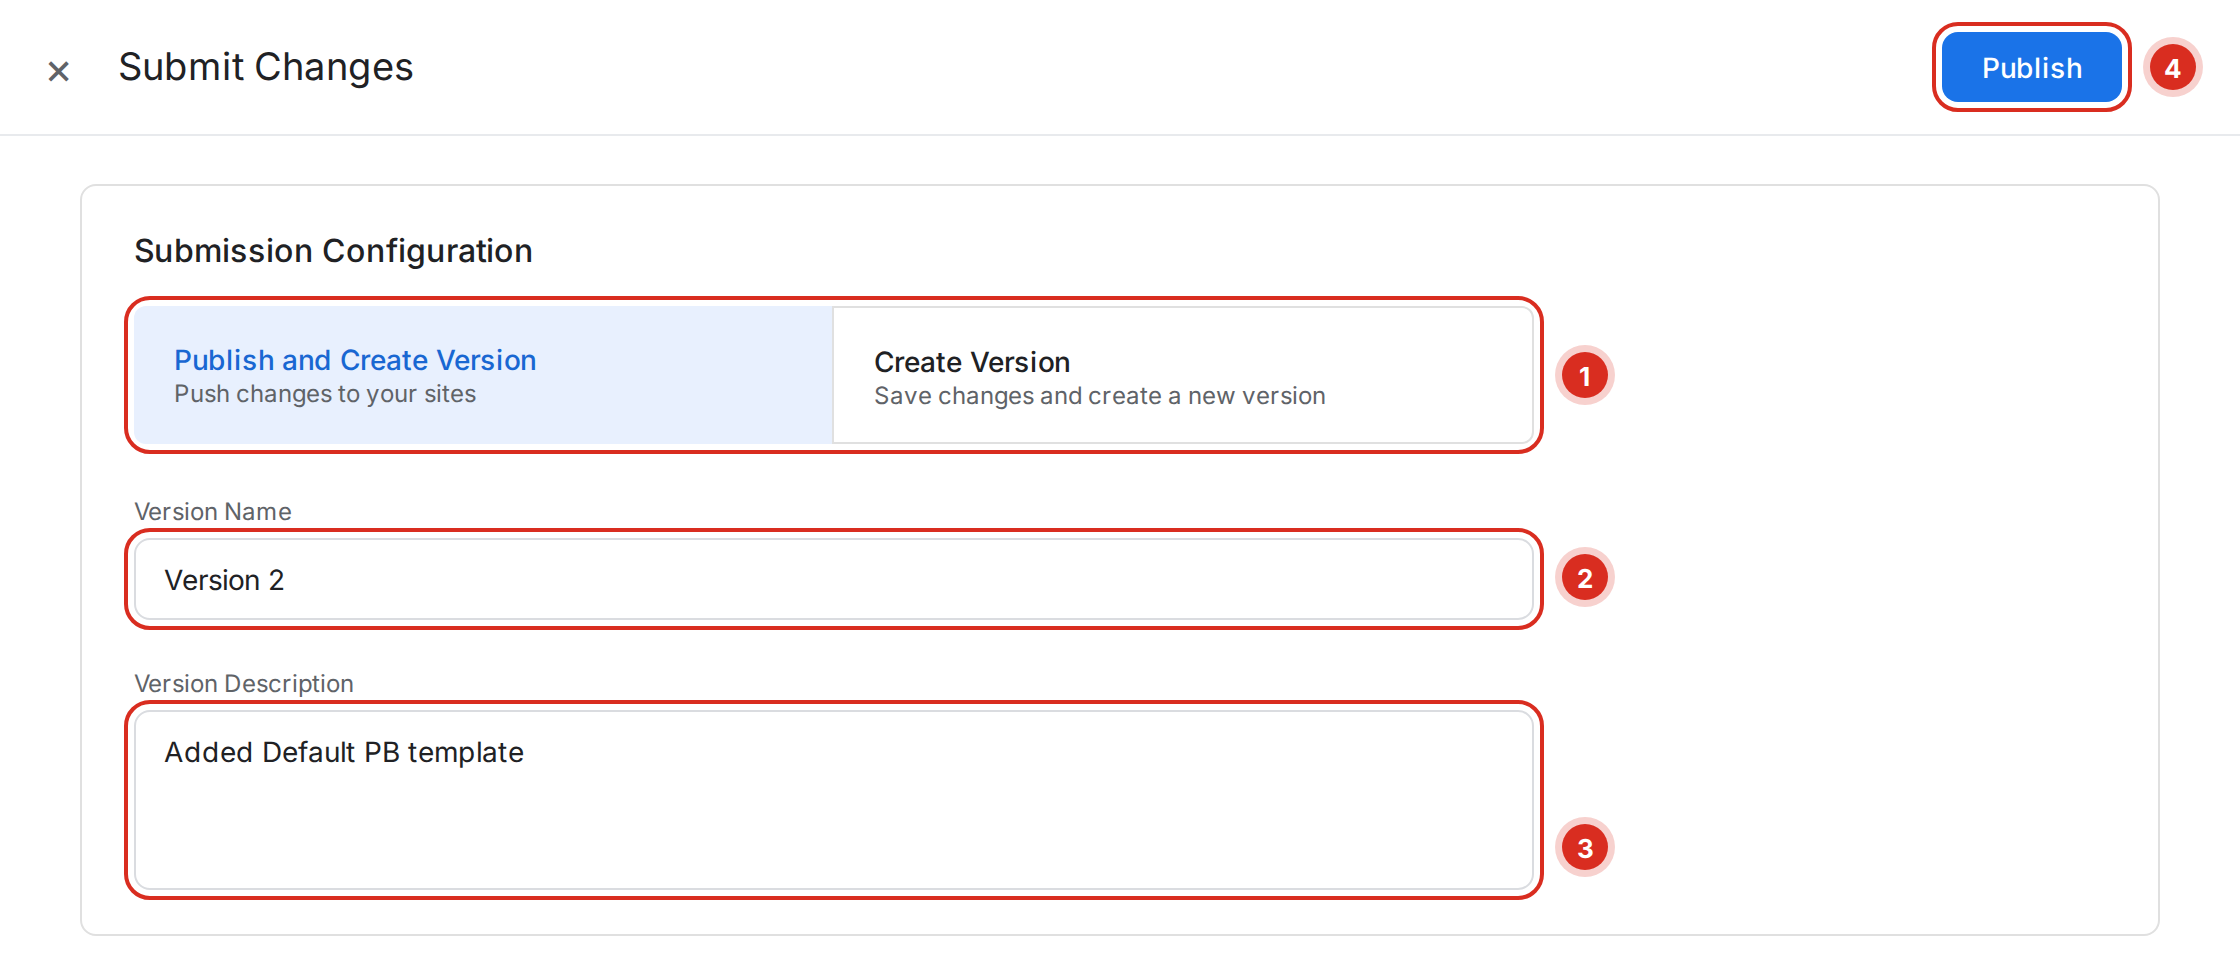
Once the testing looks right, click Submit and leave Publish and Create Version selected (1). Name the version one number up from the last one (2) — a fresh container is on Version 1, so this becomes Version 2 — and describe what you did in the Version Description (3), e.g. “Added Default PB template”. Click Publish (4).
Back on the container Overview you should see the container ID, the Google tag, and the GA4 destination all linked together. The customer is now on base-level PracticeBeat tracking.
Quick reference
| Situation | Action |
|---|---|
| Customer is not in the Tag Manager list | Create Account — business name, United States, share data on, container named after the domain, Web platform |
| Customer already has an account | Open their existing container; do not create a second account |
| Customer has more than one container | Match the container to the site you are working on before making any changes |
| Brand-new empty container | Import the template with Overwrite |
| Existing container with work already in it | Import with Merge, unless you intend to reset it |
| Need the template file | Google Drive → PracticeBeat Customer Resources → GTM Templates |
| Need the GA4 measurement ID | GA4 → Admin → Data collection and modification → Data streams → web stream |
| Customer is on Ads or is a VIP with extra tracking | Use the template and guide for that package, or escalate to Chris or Matt |
Known quirks
- Account and container are two separate levels. A customer has one account; most have one container inside it, but some have two or three — pick carefully.
- The container name is the domain, not the practice name. The account name is the practice name.
- The container ID has to be pasted into the PracticeBeat Launch Tools dashboard before tracking will do anything on the live site.
- The measurement ID is set once in the Measurement ID variable, not per tag — the template reuses that variable in about six places.
- The domain in the UTM Transfer Tag takes no
https://and no trailing slash. - Version names are set manually, one up from the previous version. A container that has just been created sits on Version 1.
- Always preview and test the appointment and phone buttons before submitting — publishing pushes straight to the live site.
- The Essentials template is base-level tracking only; anything beyond that needs a different template and a different guide.
Was this article helpful?
That’s Great!
Thank you for your feedback
Sorry! We couldn't be helpful
Thank you for your feedback
Feedback sent
We appreciate your effort and will try to fix the article